Published
- 9 min read
SonarQube Tutorial
A comprehensive step-by-step tutorial on setting up and using SonarQube for Python programming. This tutorial covers installation, configuration settings, and analysis of code issues.
Introduction
SonarQube is an open-source tool that continuously inspects code quality. It analyzes code to detect bugs, security vulnerabilities, and code smells in 20+ programming languages. SonarQube seamlessly integrates into the development process and provides real-time feedback to developers and project managers about the health of their code and applications. Using predefined rules and metrics, SonarQube helps maintain clean, maintainable, and secure codebases. It’s widely used in software development to enforce coding standards, improve code reliability, and streamline the development lifecycle. SonarQube can be integrated with build tools (Maven, Ant, Gradle), continuous integration servers (Jenkins, Hudson, Bamboo), and version control systems (SVN, Git, Mercurial).
Why SonarQube?
SonarQube’s primary goal is to ensure high code quality and maintainability by providing actionable insights and metrics. SonarQube performs the following functions:
- Code analysis: SonarQube scans source code for bugs, security vulnerabilities, and code smells, providing detailed reports and remediation suggestions.
- Technical debt estimation: SonarQube calculates the effort required to fix issues and improve code quality, helping teams prioritize refactoring tasks.
- Quality gates and profiles: SonarQube sets quality gates based on predefined criteria, ensuring that code meets specific standards before release. Quality profiles allow customization of coding rules and conventions.
- Continuous inspection: SonarQube integrates with CI/CD pipelines, enabling continuous code analysis and feedback during development.
- Security: SonarQube includes built-in security analyzers for popular languages, detecting common security flaws and weaknesses.
- Code coverage: SonarQube measures test coverage and encourages a test-driven development approach.
In this post, let’s explore how to install SonarQube locally and try to scan a small Python script. Let’s also examine the SonarScanner report on code smells, code coverage and security issues/static checks.
Let’s consider the below Python script to demonstrate the different types of issues that SonarQube can detect:
       import requests
import re
from builtins import input as inp


def get_user_input():
    """
    Get user input from the command line.
    :return: The user input as an username string.
    """
    user_input = inp("Enter a username:")
    try:
        match = re.fullmatch("^[a-zA-Z]*$", user_input)
        if match is not None:
            return user_input
        else:
            print("Invalid Username")
    except Exception as e:
        raise e
    finally:
        return "dummy"


def Find_nationality(username):
    """
    Find the probable nationality of the user.
    :param username: The username to find the nationality of.
    :return: The country dictionary.
    """
    res = requests.get("http://api.nationalize.io/?name="+username)
    countries = res.json()["country"]
    for country in countries:
        if country["probability"] == 0.100:
            return country


def print_country(country):
    """
    Print user's country name.
    :param username: The country dictionary.
    """
    if country["id"] == "US":
        print("The user is likely located in the United States.")
    elif country["id"] == "GB":
        print("The user is likely located in United Kingdom.")
    elif country["id"] == "SE":
        print("The user is likely located in Sweden.")
    elif country["id"] == "IT":
        print("The user is likely located in Italy.")
    elif country["id"] == "IS":
        print("The user is likely located in Iceland.")
    elif country["id"] == "FR":
        print("The user is likely located in France.")
    # elif country["id"] == "CA":
        # print("The user is likely located in Canada.")
    # TODO: Complete this for remaining countries.


def print_probability(country):
    """
    Print probability for each country.
    :param username: The country dictionary.
    """
    if country["id"] == "US":
        print("The probability is: "+country["probability"])
    elif country["id"] == "GB":
        print("The probability is: "+country["probability"])
    elif country["id"] == "SE":
        print("The probability is: "+country["probability"])
    elif country["id"] == "IT":
        print("The probability is: "+country["probability"])
    elif country["id"] == "IS":
        print("The probability is: "+country["probability"])
    elif country["id"] == "FR":
        print("The probability is: "+country["probability"])
    # elif country["id"] == "CA":
        # print("The user is likely located in Canada.")
    # TODO: Complete this for remaining countries.


def main(args=None):
    """
    The main function.
    """
    args = get_user_input()
    country = Find_nationality(args)
    print_country(country)
    print_probability(country)


if __name__ == "__main__":
    try:
        main()
    except ValueError as e:
        print(e)
Note: The code is intentionally bad to demonstrate the various issues identified by SonarQube.
Unit Test:
       import unittest
from src.main import get_user_input
from unittest.mock import patch


class TestUserInput(unittest.TestCase):
    @patch('src.main.inp')
    def test_user_input(self, mock_input):
        mock_input.return_value = "Nathaniel"
        self.assertEqual("dummy", get_user_input())


if __name__ == '__main__':
    unittest.main()
To analyze this code using SonarQube, we need to follow the following steps:
- Install SonarQube: Download and install SonarQube on your local machine or a server.
- Create a SonarQube Project: Create a new project in SonarQube for the Python code.
- Configure SonarQube Scanner: Configure the SonarQube scanner to analyze the Python code. The SonarQube scanner is a command-line tool used to analyze the code.
- Run the SonarQube Scanner: Run the SonarQube scanner to analyze the code.
- Analyze the Results: Analyze the results in the SonarQube dashboard.
Let’s go through the steps one by one.
1. Installation:
- Launch Docker Desktop on your local machine.
- Pull the SonarQube image: Open a terminal or command prompt and run the following command to pull the latest SonarQube image from Docker Hub:
docker pull sonarqube - Start the SonarQube container: Once the image has been pulled, you can start the SonarQube container by running the following command:
This command will start a new container named SonarQube, map ports 9000 and 9092 of the container to the same ports on the host machine, and start the SonarQube service inside the container.docker run -d --name sonarqube -p 9000:9000 -p 9092:9092 sonarqube - Wait for SonarQube to start: It may take a few minutes for SonarQube to start up and initialize its database. You can check the container logs to see when they’re ready by running
docker logs sonarqube
-
Download the SonarQube package: Go to the SonarQube download page (https://www.sonarqube.org/downloads/) and download the package that matches your operating system.
-
Install SonarQube: Follow the installation instructions for your operating system. For example, if you are using Windows, you can follow these steps:
- Extract the downloaded package to a folder (e.g., C:\SonarQube).
- Open a command prompt as an administrator and navigate to the bin folder (e.g., C:\SonarQube\bin\Windows-x86-64).
- Run the following command to start the SonarQube server:
StartSonar.bat - Wait for the server to start up completely. This may take a few minutes.
2. Create a SonarQube Project
Before analyzing our project, we must create a SonarQube project to connect to our source code repository. Here are the steps:
- Open a web browser and navigate to the SonarQube web interface (e.g., http://localhost:9000).
- Click on the “Projects” tab.
- Click on the “Create a local project” button.
- Enter the project name and click on the “Next” button.
- Select “Use the global setting” and click the “Create project” button.
- Generate a token for the sonar scanner by clicking on the “Locally” button. Note down the generated token as well as the project key.
3. Configure the SonarQube Scanner
Installation
Pull the sonar scanner image using the below command.
docker pull sonarsource/sonar-scanner-cli- Download the sonar scanner zip file from Sonar Scanner CLI
- Extract the downloaded package to a folder (e.g., C:\SonarScanner).
- Add the bin directory to your path. (e.g., C:\SonarScanner\bin).
Configuration
Consider a simple project structure, as shown in the image below.
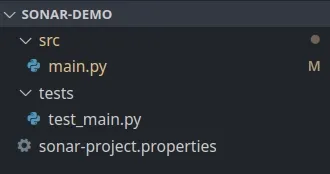
Create a configuration file called sonar-project.properties in the root directory of your project with the following configuration.
       # must be unique in a given SonarQube instance
sonar.projectKey=demo

# --- optional properties ---

# defaults to project key
#sonar.projectName=My project
# defaults to 'not provided'
sonar.projectVersion=1.0

# Path is relative to the sonar-project.properties file. Defaults to .
sonar.sources=.

# Encoding of the source code. Default is default system encoding
#sonar.sourceEncoding=UTF-8

# Python Version
sonar.python.version=3.8

# Exclude tests and virtual environment
sonar.exclusions=tests/**/*, sonar/**/*
sonar.coverage.exclusions=tests/**/*,sonar/**/*

# Test coverage reports
sonar.python.coverage.reportPaths=coverage.xml
In the above configuration, sonar.python.coverage.reportPaths is used to specify the path to the coverage report generated by the coverage.py tool. The coverage.py’s xml command writes coverage data to a “coverage.xml” file in a format compatible with Cobertura. Run the following commands to run the tests and generate the XML file.
       python -m venv sonar
source ./sonar/bin/activate
coverage run -m unittest tests/test_main.py
coverage xml
4. Run the SonarQube Scanner
Navigate to the base directory of the project and run the following commands.
       docker run \
    --network=host \
    --rm \
    -e SONAR_HOST_URL="http://localhost:9000" \
    -e SONAR_SCANNER_OPTS="-Dsonar.projectKey=<project-key>" \
    -e SONAR_TOKEN="<project-token>" \
    -v "${PWD}:/usr/src" \
sonarsource/sonar-scanner-clisonar-scanner -Dsonar.token=<project-token>Replace the <project-key> and <project-token> with the sonar project key and token generated in step 1.
5. Analyze the Results
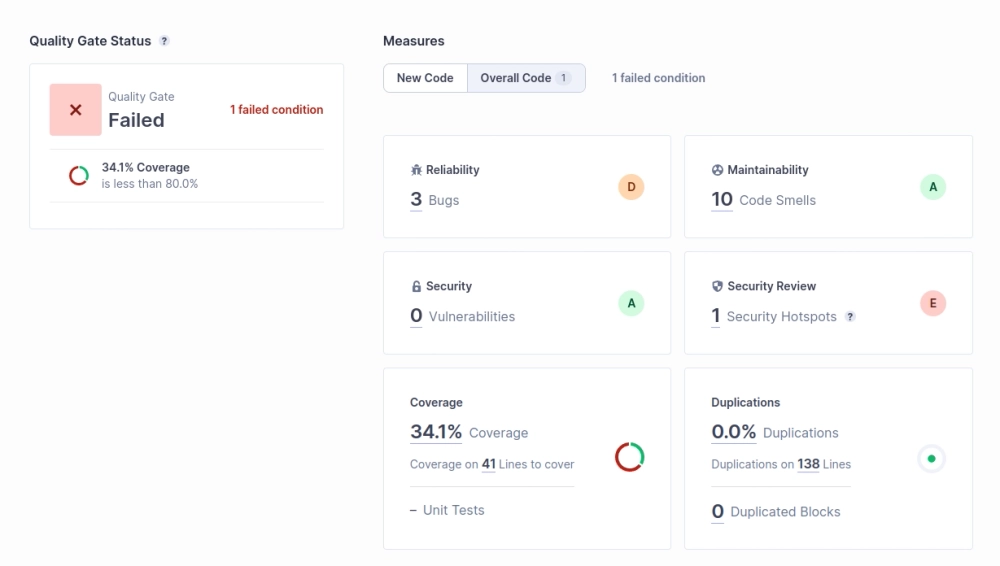
The following screenshot shows the SonarQube dashboard for the main.py script and test_main.py unit test. SonarQube categorizes issues into bugs, vulnerabilities, and code smells. These bugs, vulnerabilities, and code smells are further categorized into high, medium and low issues. Users can filter, triage, and assign issues to developers for resolution.
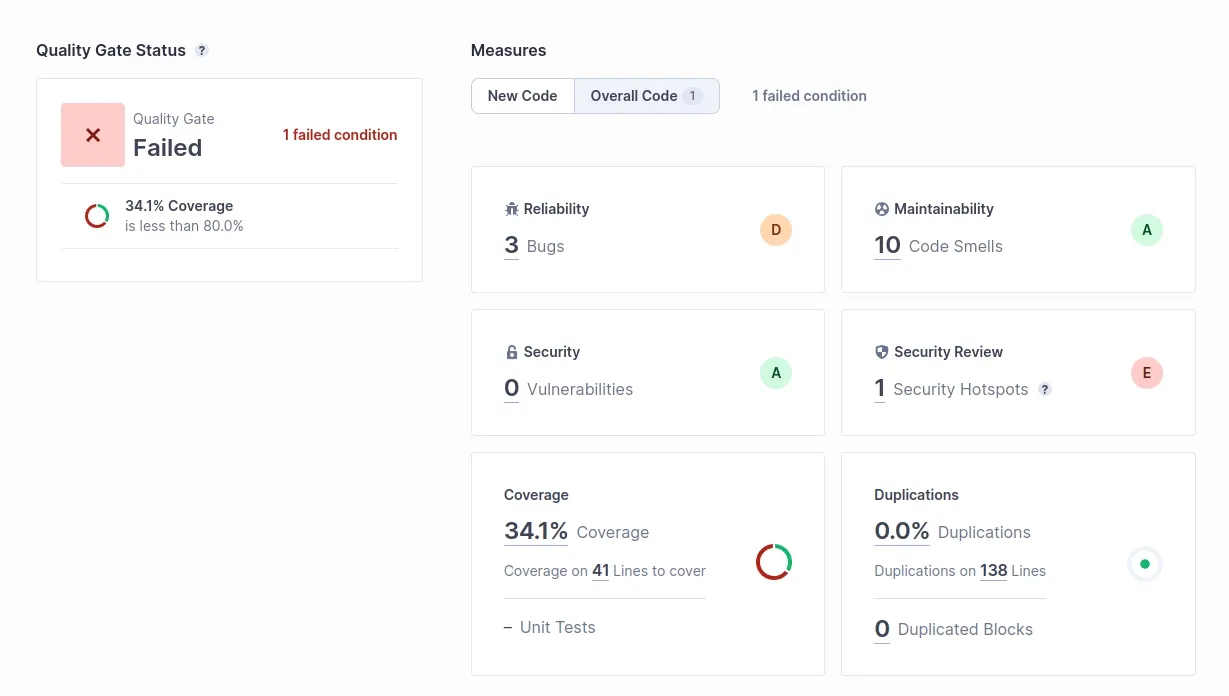
As shown in the dashboard, SonarQube provides an overview of
-
Code Smells and Bugs: SonarQube identifies code smells, such as duplicated code, empty catch blocks, and unnecessary object creation. It also detects potential bugs, like division by zero, null pointer dereferences, and unreachable code. For our example, SonarQube detected the following code smells and bugs.
-
Code Smells:
- Add logic to the except clause on line 18 or eliminate it and rethrow the exception automatically.
- Rename function “Find_nationality” to match the regular expression
^[a-z*]a-z0-9*]\*$. - Complete the task associated with this “TODO” comment.
- Define a constant instead of duplicating this literal “The probability is: ” 6 times.
- Either merge the branches on lines 67, 69, 71, 73, and 75 with the identical one on line “65” or change one of the implementations.
-
Bugs:
- Remove the “return” statement from the “finally” block.
- Do not perform equality checks with floating point values.
- Introduce a new variable or use its initial value before reassigning ‘args’.
These issues are self-explanatory. We can assign them to specific developers to fix them.
-
-
Technical Debt: SonarQube estimates the time required to fix issues and improve code quality, measured in hours. In our example, the technical debt is 1 hour 17 mins, indicating minimal effort to address the identified issues.
-
Coverage: SonarQube measures test coverage and encourages a test-driven development approach. For our example, SonarQube reports 34.1% line coverage since we have written only one test case.
-
Quality Gates: SonarQube sets quality gates based on predefined criteria, ensuring that code meets specific standards before release. For our example, the quality gate is “Failed,” as there is an 80% code coverage criteria set on the overall code.
-
Security: SonarQube includes built-in security analyzers for popular languages, detecting common security flaws and weaknesses. In our example, one security hotspot is identified for using the http protocol instead of https since it is insecure.
Conclusion
SonarQube is a powerful tool for ensuring code quality and maintainability. By providing automated code reviews, detecting bugs, vulnerabilities, and code smells, and promoting coding standards and best practices, SonarQube helps developers build high-quality software. Using a simple Python script and unit test, this article demonstrated SonarQube’s features and utility, illustrating how it can help developers identify and address issues early in the development cycle. Integrating SonarQube into a CI/CD pipeline enables continuous code analysis and feedback, enhancing its value and ensuring that code consistently meets high-quality standards.
You can find all the code used in this demonstration in the repository provided below.