Published
- 7 min read
Test Driven Development (TDD) with practical examples
Streamline Your Code with Confidence: Mastering Test Driven Development with Practical Examples.

Introduction
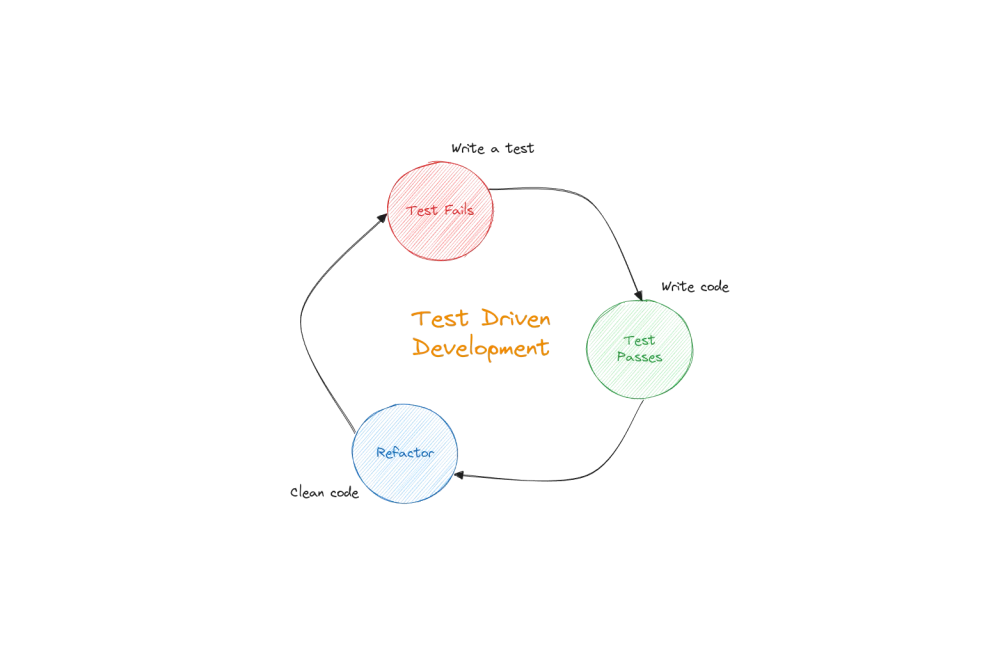
Test-driven development (TDD) is a software development approach in which tests are written before the actual code. The process involves writing a test for a small piece of functionality, watching it fail, and then writing the minimum amount of code necessary to make the test pass. This cycle is repeated until all tests have passed and the desired functionality has been implemented.
TDD can help ensure that your code is correct from the start, making it easier to maintain and extend over time. It also encourages sound design principles by forcing you to think about how your code will be tested before you write it. By writing tests before implementing features, developers can ensure that their code meets functional requirements, leading to higher quality and fewer bugs. Additionally, TDD promotes using smaller, focused functions and classes, making code easier to understand, test, and modify in the long term. Overall, TDD results in a more robust and reliable codebase better suited for collaborative development and maintenance over time.
In this blog post, we’ll explore how TDD leads to more maintainable, modular, and error-free software by writing APIs in Python.
Project Structure
Before we begin let’s consider a simple project structure, as shown below.
       ├── src             // Main python execution scrupts
|  ├── __init__.py
|  ├── main.py
|  |  └── ...
|
├── tests           // Test Scripts
|  ├── __init__.py
|  ├── test_main.py
|  |  └── ...
A Simple Example
First, let’s start with a simple example. Suppose we want to create a function that calculates the area of a circle given its radius. Using TDD, we would first write a test for this functionality:
       def test_circle_area():
    assert circle_area(1) == 3.141592653589793
/CodeVxDev
tdd
pytest
11:9:15
============================ test session starts =================================
platform linux — Python 3.12.2, pytest-8.1.1, pluggy-1.4.0
rootdir: /home/CodeVxDev/tdd
collected 1 item
tests/test_main.py
F
[100%]
=================================== FAILURES =====================================
__________________________________ test_add ______________________________________
def test_circle_area():
> assert circle_area(1) == 3.141592653589793
E NameError: name ‘circle_area’ is not defined
tests/test_main.py
:5: NameError
=========================== short test summary info ===============================
FAILED
tests/test_main.py::test_add - NameError: name ‘circle_area’ is not defined
============================== 1 failed in 0.02s ==================================
As shown above, this test failed because the circle_area function hasn’t been defined yet. Next, we would define just enough of the circle_area function to make the test pass:
       import math

def circle_area(r):
    return math.pi * r ** 2
When we rerun our test, it will pass, as shown below.
/CodeVxDev
tdd
pytest
11:9:15
============================ test session starts =================================
platform linux — Python 3.12.2, pytest-8.1.1, pluggy-1.4.0
rootdir: /home/CodeVxDev/tdd
collected 1 item
tests/test_main.py
.
[100%]
============================== 1 passed in 0.01s ==================================
This process of writing a failing test, then writing code to make it pass, is known as the “red-green” cycle because the test runner will typically display a red failure message when the test fails and a green success message when it passes.
Once all tests have passed, we can refactor our code if necessary. Refactoring involves making changes to the code to improve its structure or readability without changing its behavior. In TDD, this step is often referred to as “refactoring for clarity” because the primary goal is to make the code easier to understand and maintain.
For example, we might decide to extract the calculation of math.pi * r ** 2 into its own function:
       import math

def square_radius(r):
    return r ** 2

def circle_area(r):
    return math.pi * square_radius(r)
By following the TDD process, we can ensure that our code is correct from the start and easy to maintain over time. This approach can be beneficial when working on complex projects or when collaborating with other developers.
A Practical Example
Let’s consider a more practical example involving API development in Python using Flask. Suppose we want to create an endpoint that returns the area of a circle given its radius. Using TDD, we would start by writing a test:
       from flask import Flask
import json
import unittest
from src import main

class CircleAreaTest(unittest.TestCase):
    def setUp(self):
        self.app = Flask(__name__)
        self.client = mian.app.test_client()

    def test_circle_area(self):
        # Send a GET request to the endpoint
        response = self.client.get('/circle-area?radius=1')

        # Parse the JSON response
        data = json.loads(response.data.decode('utf-8'))

        # Check that the correct area is returned
        assert data['area'] == 3.141592653589793

if __name__ == '__main__':
    unittest.main()
This test will fail because the endpoint hasn’t been defined yet. Next, we would create just enough of the endpoint to make the test pass:
       from flask import Flask, jsonify, request
import math

app = Flask(__name__)

@app.route('/circle-area')
def circle_area():
    radius = float(request.args.get('radius'))
    return jsonify({'area': math.pi * radius ** 2})

if __name__ == '__main__':
    app.run()
Now, when we run our test again, it should pass. Once all tests have passed, we can refactor our code if necessary. For example, we might decide to extract the calculation of math.pi * radius ** 2 into its own function:
       from flask import Flask, jsonify, request
import math

app = Flask(__name__)

def circle_area(radius):
	return math.pi * radius ** 2

@app.route('/circle-area')
def get_circle_area():
	try:
		radius = float(request.args.get('radius'))
	except ValueError:
		return jsonify({'area': "Invalid Radius"})
	area = circle_area(radius)
	return jsonify({'area': area})

if __name__ == '__main__':
app.run()
Parameterised Tests (table-driven tests)
In addition to writing a single test, we can also use parameterised tests to test our endpoint with multiple inputs and expected outputs. For example, we might write the following parameterised test:
       from flask import Flask
import json
import unittest
from src import main
from parameterized import parameterized

class CircleAreaTest(unittest.TestCase):
    def setUp(self):
        self.app = Flask(__name__)
        self.client = main.app.test_client()

    @parameterized.expand([
        (0, 0),
        ("abc", "Invalid Radius"),
        (-20, 1256.6370614359173)
    ])
    def test_circle_area(self, radius, expected):
        # Send a GET request to the endpoint
        response = self.client.get('/circle-area?radius={}'.format(radius))

        # Parse the JSON response
        data = json.loads(response.data)

        # Check that the correct area is returned
        assert data['area'] == expected

if __name__ == '__main__':
    unittest.main()
When we run our test, it will pass, as shown below.
/CodeVxDev
tdd
pytest
11:9:15
============================ test session starts =================================
platform linux — Python 3.12.2, pytest-8.1.1, pluggy-1.4.0
rootdir: /home/CodeVxDev/tdd
collected 3 items
tests/test_main.py
...
[100%]
============================== 3 passed in 0.10s ==================================
The command line output shows that the test execution collected 3 items and 3 passed in 0.10s, even though we have written one test. This is because of the 3 parameterized inputs passed to the test.
Parameterized tests are beneficial when dealing with bad inputs. Instead of duplicating test logic several times, we can run the same assertion against a collection of known invalid bodies that we expect to fail similarly.
Integration Tests
Integration tests are software tests that focus on testing how different components or modules of a system work together. Unlike unit tests, which test individual units or functions in isolation, integration tests aim to simulate real-world scenarios by exercising multiple system parts simultaneously.
In our example of an API endpoint for calculating the area of a circle, we wrote integration tests that cover scenarios such as:
-
Sending a GET request to the
/circle-areaendpoint with a valid radius parameter -
Sending a GET request to the
/circle-areaendpoint with a negative or zero radius parameter -
Sending a GET request to the
/circle-areaendpoint with a non-numeric radius parameter -
Testing that the endpoint returns the correct HTTP status code and response format for each of these scenarios
These integration tests would exercise the Flask application, the route handlers, and the functions used to calculate the area of a circle. They would help ensure that the different components of our system work together correctly and consistently.
Unit Tests
Unit tests focus on testing individual units or functions in isolation. For example, we might write a unit test for the circle_area function to ensure that it correctly calculates the area of a circle given a radius parameter:
       import unittest
import math

class TestCircleArea(unittest.TestCase):
  def test_circle_area(self):

    # Test with a positive radius
    self.assertAlmostEqual(circle_area(1), 3.141592653589793)

    # Test with a non-numeric radius (should raise ValueError)
    with self.assertRaises(ValueError):
      circle_area("abc")

if __name__ == '__main__':
  unittest.main()
This unit test would ensure that the circle_area function behaves correctly for a given input without involving any other components or modules of the system. By testing individual units in isolation, we can more easily identify and fix bugs and ensure that each system component is robust and reliable.
Conclusion
By following the TDD process, we can ensure that our code is correct from the start and easy to maintain over time. This approach can help us catch bugs early in the development process and deliver a high-quality product to our users. It can also be beneficial when working on complex projects or collaborating with other developers.
You can find all the code used in this demonstration in the repository provided below.